Ingredients
- Have a static home page with comments removed throughout the site ✓
- Have a link to the original theme (Please note that the description of this theme on this link is for the pro version. The free version doesn’t offer even half of the capabilities the pro version does. I am using the free version for this project.) ✓
- Be fully responsive ✓
- On the Contact page, I have opted for the embedded Google map to only appear on large and medium screens. It will disappear on small devices.
- On the Services page, the images are displayed left, right, left and when in mobile view this would make row 1 with the image first, text second; row 2 text first, image second; and row 3 image first, text second. So I created an additional row that is only displayed on small screens so that row 2 displays image first, text second to match the others.
- Have a thoroughly well-designed and consistent aesthetic ✓
- Be filled with relevant content ✓
- Have a working nav system(s) ✓
- Use a contact form plug-in with working contact form ✓
- Contact Form 7 (See Contact page)
- Use a gallery/slideshow/lightbox widget ✓
- Envira Gallery (See Menu page)
- Use other customized widgets (ALL individually noted and linked in your Posts/News/Blog page) ✓
Additional requirements:
- Create and use a child theme based on your chosen theme ✓
- I created a counter-child theme
- Utilized a Google Web font via head tag & stylesheets ✓
- Balthazar is used for h1 and h2.
- Customize the styles beyond the Dashboard (using CSS placed on the stylesheet of the site) ✓
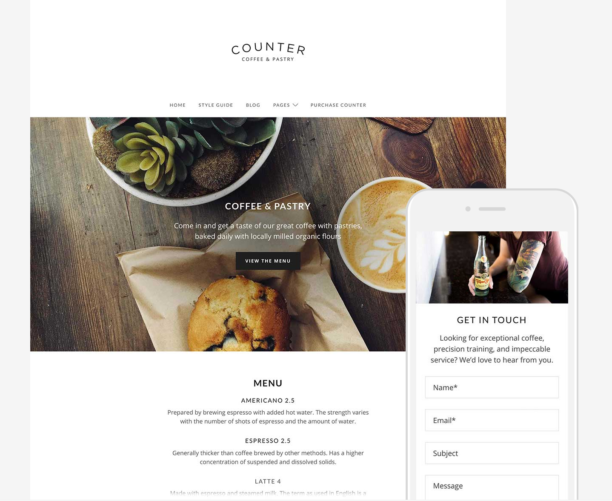
- I altered the active link color (as seen above under widget requirement) and hover link color (as seen in the .main-navigation) from the theme’s original orange to my chosen red color (#710F11) used throughout the site and made the text bold (within CSS not HTML). This theme is very minimal unless you buy the pro version, and therefore doesn’t allow for a lot of things to be changed via the Customizer, including headers, text colors, margins. Those I’ve had to either make classes for and add additional CSS under the “Additional CSS” option or go into the stylesheet to change. Additional changes include font-size increase for the h1 and h2 elements, as well as bottom-margin adjustment for the “.single-page .entry-title” class (h1 titles on the subpages About, Menu, Contact, and Services) to 0 for the pages, and from 1.5em to 0.75em for the @media screen and (min-width: 1024px). I also changed the button link and hover colors on the Home and Contact pages.
- I altered the active link color (as seen above under widget requirement) and hover link color (as seen in the .main-navigation) from the theme’s original orange to my chosen red color (#710F11) used throughout the site and made the text bold (within CSS not HTML). This theme is very minimal unless you buy the pro version, and therefore doesn’t allow for a lot of things to be changed via the Customizer, including headers, text colors, margins. Those I’ve had to either make classes for and add additional CSS under the “Additional CSS” option or go into the stylesheet to change. Additional changes include font-size increase for the h1 and h2 elements, as well as bottom-margin adjustment for the “.single-page .entry-title” class (h1 titles on the subpages About, Menu, Contact, and Services) to 0 for the pages, and from 1.5em to 0.75em for the @media screen and (min-width: 1024px). I also changed the button link and hover colors on the Home and Contact pages.
Directions
Build a WordPress site. The site will not be solely a blog, but rather for a business, organization, or periodical of some kind. The site must consist of 5 separate pages (such as Home, Services, Gallery (I created a Menu page that features a gallery of food images — hope that works!), About, Contact, and must have a News/Blog/Posts page). Choose and install a theme. The theme must be fully customized for your purposes (modified styles, etc.).